How to Replace the Gas Cylinder on a Modern Office Chair?
Does your office chair sink lower every time you sit down? That annoying sinking feeling usually means one thing. Your gas cylinder has worn out.
The good news? You don’t need to buy a brand new chair. Replacing a gas cylinder is a simple fix you can do at home.
This guide walks you through the entire process step by step. We will show you how to remove the old, faulty cylinder safely. You will also learn how to install a fresh one in its place.
By the end of this article, your chair will adjust smoothly again. Let’s get your seat back to its comfortable, proper height.
In a Nutshell
- Remove the seat first. Flip your chair over and find the metal plate under the seat. Unscrew it from the old gas cylinder to access the mechanism.
- Apply penetrating oil. Spray WD-40 on the spot where the cylinder meets the base and the seat mechanism. This step loosens rust and grime buildup.
- Choose your removal method. Use a pipe wrench to twist and pull the cylinder for standard cases. For stubborn cylinders, flip the base upside down in a deep container and strike the cylinder with a hammer.
- Watch for older chairs. These often need more force because parts have fused together over time. Patience helps here.
- Avoid common mistakes. Skipping the oil step or grabbing the wrong tool size causes most failed attempts. Take your time with lubrication.
- Budget your time. The entire job takes about 20 minutes once you have your tools ready. Simple preparation makes everything easier.
Signs Your Gas Cylinder Needs Replacing
Your gas cylinder shows several clear warning signs before it completely fails. Learning to spot these signals helps you act before your chair becomes unusable.
The most obvious sign is constant sinking. Your chair drops lower every time you sit down, even if you just adjusted it. You push the lever to raise the seat, but it slowly descends within minutes. This happens because the gas inside the cylinder loses pressure over time.
Another common indicator is resistance when adjusting height. The lever feels stiff or stuck. You may need to push much harder than normal to move the seat up or down. Sometimes the chair refuses to stay at your chosen height no matter what you do.
Listen for hissing sounds when you use the height adjustment lever. This noise suggests gas is escaping from a small leak in the cylinder. You might also notice the lever feels mushy or unresponsive under your hand.
Check if your chair tilts to one side. This happens when one gas cylinder works better than the other. The seat sits unevenly, making your chair uncomfortable and potentially damaging your spine during long work sessions.
Visible damage around the cylinder base is another red flag. Look for dents, cracks, or rust on the metal cylinder itself. These physical problems prevent the cylinder from holding pressure properly.
Finally, if your chair is several years old and shows any of these signs, replacement is likely your best option. Older cylinders lose effectiveness naturally. A new cylinder restores full functionality and makes your chair feel brand new again. Don’t wait until the chair becomes completely unusable before taking action.
Tools and Materials You’ll Need
Before you start the replacement job, gather the right tools. Having everything ready saves time and prevents frustration during the process.
A pipe wrench is your main tool for this task. This wrench grips the cylinder firmly so you can twist and remove it. Make sure the wrench size fits your cylinder properly. A wrench that’s too large or too small won’t grip well.
You’ll also need a rubber mallet or metal hammer. Some cylinders come out easily with just the wrench. Older chairs often have stuck cylinders that need extra force. The hammer helps you strike the cylinder base to loosen it from the seat mechanism.
Penetrating oil like WD40 makes a huge difference. This oil breaks down rust and corrosion at the connection points. Spray it generously where the cylinder meets the seat plate. Wait about 10 to 15 minutes for the oil to soak in before you start removing anything.
A deep container is useful for the flip method. If your cylinder resists removal, you’ll flip the entire chair base upside down and place it in the container. This positions the cylinder for a direct downward strike with your hammer.
Keep a clean cloth nearby to wipe away excess oil and debris. You might also want a small brush to clean the connection area before installing the new cylinder.
Having these items ready before you begin makes the replacement smoother. You won’t waste time searching for tools halfway through the job. The whole process typically takes about 20 minutes once you have everything gathered.
Step-by-Step: Removing the Old Gas Cylinder
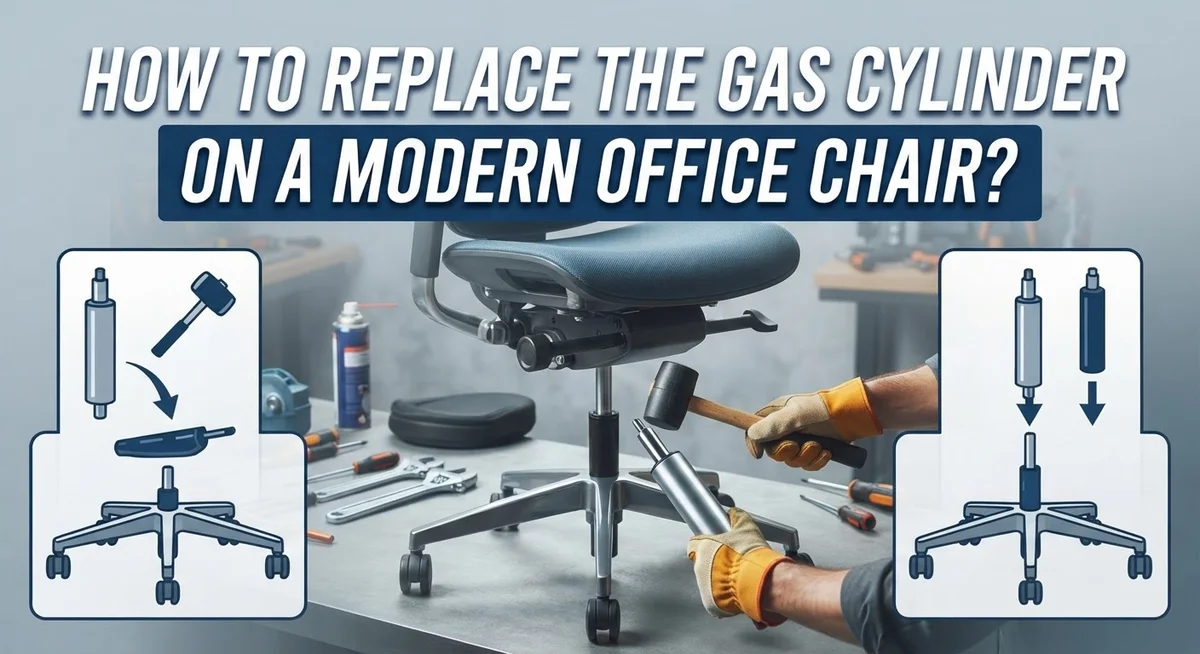
Start by flipping your chair upside down so you can see the gas cylinder clearly. The cylinder connects the seat mechanism to the base. You’ll see a metal plate or seat pan attached to the top of the cylinder.
Locate where the seat mechanism meets the gas lift. This junction point is your target. Apply penetrating oil generously around this connection. Let it sit for about five minutes so the oil can work into the tight spaces.
Once the oil has soaked in, grab your pipe wrench. Position it firmly around the cylinder body, not the seat plate. This matters because you want to grip the cylinder itself. Twist the wrench slowly to loosen the connection. Don’t rush this step.
As the cylinder begins to turn, continue twisting while gently pulling upward. The seat plate should separate from the cylinder. If it resists, apply more penetrating oil and wait a few minutes longer.
For stubborn cylinders that won’t budge, try the hammer method. Keep your chair flipped upside down in a deep container or bucket. Strike the side of the cylinder gently but firmly with a rubber mallet or metal hammer. This shock can break the corrosion seal. Then apply oil again and retry the wrench method.
Work slowly and steadily. Rushing causes damage to the threads or seat plate. Most cylinders come free within ten to fifteen minutes using these techniques. If you’re still stuck after twenty minutes, try alternating between oil application and gentle hammer strikes.
Once the old cylinder separates completely, set it aside. You’re now ready to install your replacement cylinder.
Dealing with a Stuck or Seized Cylinder
When your gas cylinder refuses to move, stay calm. This happens more often than you think, especially with older chairs. The key is using the right approach and giving yourself enough time.
Start by applying penetrating oil generously around where the cylinder connects to the seat mechanism. Let it soak for about 15 to 20 minutes. This step matters more than you realize. The oil seeps into tight spaces and loosens rust or debris that’s holding everything in place.
After the oil has soaked, grab your pipe wrench and position it firmly on the cylinder. Apply steady pressure as you twist. Don’t yank hard all at once. Instead, use slow, deliberate movements. Rock the cylinder back and forth gently. This rocking motion helps break the seal that’s keeping it stuck.
If the wrench method isn’t working, try the hammer technique. Flip your chair base upside down and place it in a deep container. This protects your floor and gives you better control. Strike the cylinder gently but firmly with a metal hammer. Aim for the side of the cylinder, not the top. Space your strikes about 10 seconds apart. After a few strikes, try twisting with your wrench again.
Patience is essential here. Rushing leads to stripped threads or broken cylinders. Some stuck cylinders need multiple oil applications and waiting periods.
If you’ve tried both methods for 30 minutes without success, the cylinder may be severely corroded. At this point, consider seeking professional help rather than risking damage to your chair’s base. Most repair specialists have specialized tools for these tough situations.
Installing the New Gas Cylinder
Now that you’ve removed the old cylinder, installing the new one is straightforward. The process takes just a few minutes if you follow the right steps.
Start by examining the new gas cylinder before installation. Check that it matches your chair model and that all components look undamaged. The cylinder should have a smooth surface with no dents or cracks.
Position your chair upside down so the base is facing up. This gives you clear access to the connection point where the new cylinder will attach. Make sure your work area is stable and won’t tip over.
Apply a small amount of penetrating oil to the threads on both the new cylinder and the seat mechanism connection point. This helps the cylinder slide in smoothly and prevents future sticking.
Align the new cylinder with the opening in the seat mechanism. Push it upward firmly until you feel it seat properly. The connection should feel snug but not overly tight.
Use your pipe wrench to turn the cylinder clockwise. Tighten it gradually with steady pressure. You want it secure but not so tight that you risk stripping the threads.
Test the connection by gently tugging on the cylinder. It should not move or wiggle. If it does, tighten it a bit more.
Flip your chair back over and test the height adjustment lever. The chair should move up and down smoothly without any resistance. Listen for any unusual sounds.
If everything works properly, your replacement is complete. The entire installation process typically takes less than five minutes once you’ve removed the old cylinder.
Tips for a Smooth Replacement
Replacing a gas cylinder goes smoothly when you prepare properly. Gather all your tools before starting. You need a pipe wrench, rubber mallet or metal hammer, penetrating oil, and a deep container. Having everything within reach saves time and frustration.
Lubrication is your best friend during this process. Apply penetrating oil generously around the connection point where the seat mechanism meets the gas lift. Give the oil about 15 to 20 minutes to soak into the joint. This step makes removal significantly easier and prevents damage to the threads.
Choose your removal method based on how stuck the cylinder feels. The wrench method works well for most chairs. The hammer method becomes necessary when the cylinder refuses to budge after lubrication and wrench attempts.
Work at a steady pace throughout the job. Rushing causes stripped threads or broken cylinders. If you spend 30 minutes trying to remove the cylinder without success, it may be severely corroded. Stop and reassess rather than forcing it.
Keep a clean cloth nearby to wipe away excess oil and debris. This prevents mess on your floor and helps you see the connection points clearly.
Expect the entire replacement to take about 20 minutes for most modern office chairs. Older chairs typically require more time and effort because their cylinders sit tighter. Don’t be discouraged if an older chair takes longer. The process remains the same. Just apply more oil and give it additional soaking time between attempts. Patience yields better results than force.
Common Mistakes to Avoid
Many people make simple errors when replacing a gas cylinder. These mistakes can waste time or damage your chair. Learning what to avoid saves you frustration.
Skipping lubrication is the biggest mistake. Some people try to remove the cylinder immediately without applying penetrating oil first. The connection point sits tight for months or years. Oil loosens this bond. Without it, you’ll struggle for much longer than needed. Apply oil generously around where the cylinder meets the seat mechanism. Wait about 15 minutes before attempting removal.
Using the wrong tool size causes problems too. A pipe wrench that’s too small slips off the cylinder. A wrench that’s too large won’t fit properly in tight spaces. Choose a wrench that grips the cylinder firmly without forcing it onto the connection.
Rushing the removal process damages threads. When you twist too hard or pull too fast, metal strips inside the connection. Stripped threads mean your new cylinder won’t install correctly. Work slowly and steadily instead. Let the penetrating oil do the work for you.
Some people ignore the stuck cylinder warning signs. If your cylinder won’t budge after 15 minutes of gentle twisting, stop. Switch to the hammer method or apply more oil. Continuing to force it risks breaking the cylinder inside the base.
Forgetting to inspect the new cylinder before installation is another oversight. Check that threads look clean and undamaged. Make sure the cylinder matches your chair’s specifications. A quick inspection prevents installation problems later.
Finally, people sometimes skip the final test. After installation, always test your height adjustment lever. This confirms everything works properly before you consider the job complete.
Troubleshooting After Installation
After you install your new gas cylinder, the real test begins. Your chair needs to work properly before you consider the job done. This section walks you through what to check and how to fix common issues.
Start by flipping your chair right side up after installation. Sit in it gently and test the height adjustment lever several times. The chair should move smoothly up and down without any resistance or strange noises. If it feels stiff, you may need to apply more penetrating oil to the connection point.
Listen carefully while adjusting the height. A hissing sound means air is escaping from the cylinder. This indicates a poor connection or a defective new cylinder. Try tightening the cylinder a quarter turn with your pipe wrench. Test again to see if the hissing stops.
Check that the chair holds your weight at different heights. Slowly lean back and shift your position. The chair should not suddenly drop or rise on its own. If it does, the cylinder seal may be broken.
Wipe away any excess oil from the base and seat mechanism with a clean cloth. Oil attracts dust and dirt, which can cause future problems. Make sure no oil drips onto your floor.
Test the chair for at least two days before declaring success. Sometimes issues appear after the cylinder settles into place. If problems persist after this waiting period, the new cylinder itself may be faulty. Contact the manufacturer for a replacement if needed.
Your chair should now adjust smoothly and hold its position reliably. The replacement process is complete when everything functions as expected.
Final Thoughts
Replacing a gas cylinder is a task most people can handle at home. You just need patience and the right tools. This project saves money and extends the life of your favorite chair.
The whole process relies on three things. Proper lubrication, the right tool, and steady movements. Master these basics and you will succeed every time.
Remember that every chair behaves differently. Some cylinders slide out with ease. Others fight you every step of the way. Stay calm and adjust your approach based on what you feel.
Patience matters more than strength in this job. Forcing a stuck cylinder often creates bigger problems. Take breaks if you feel frustrated during removal.
Your new cylinder should fit smoothly once the old one is gone. Installation typically feels much easier than removal. The threads align naturally when you take your time.
Think of this repair as a skill you now own. You can help friends or family with similar chair problems. This knowledge stays useful for years.
Office chairs take daily abuse from sitting and rolling. Parts wear out naturally over time. Knowing how to fix this specific issue puts you ahead of most people.
Keep your tools organized for next time. A pipe wrench and some penetrating oil solve this problem again and again. Store these items where you can find them easily.
Your chair now sits at the perfect height. You fixed it yourself without calling anyone else. That feeling of accomplishment matters just as much as the working chair.
Trust your ability to handle small repairs like this one. Every successful fix builds confidence for the next household challenge you face.
Frequently Asked Questions
Why won’t my gas cylinder come out?
The cylinder gets stuck when dust, rust, or dried lubricant builds up at the connection point. This happens more often in older chairs. Apply penetrating oil and wait 15 to 20 minutes before trying again. The oil needs time to seep into the tight spaces. If it still won’t budge, try the flip method: turn your chair base upside down in a deep container and gently tap the cylinder with a rubber mallet.
What’s the difference between the wrench method and the hammer method?
The wrench method works best for cylinders that move a little. You grip the cylinder with a pipe wrench and twist while pulling gently. The hammer method works for stuck cylinders that refuse to budge. You flip the chair, place the base in a container, and strike the cylinder with controlled taps. Start with the wrench method first. Only use the hammer if the wrench doesn’t work after proper lubrication.
How do I know if I’m using the right tool?
A pipe wrench should fit snugly around the cylinder without slipping. If the wrench spins without gripping, it’s too large. A rubber mallet or metal hammer should be heavy enough to create impact but light enough to control. Avoid using pliers or adjustable wrenches, as these slip and strip the cylinder.
Can I damage the chair base while removing the cylinder?
Yes, if you pull too hard or twist too aggressively. The cylinder connects to the base mechanism with threads that strip easily. Use steady, even pressure instead of sudden jerks. Let the penetrating oil do most of the work. Patience prevents costly damage to your chair’s internal parts.

Hi, I’m Clara! I started SitSmartGuide to help people find chairs that truly support their comfort and health — without the guesswork. After years of dealing with back pain from bad seating, I became obsessed with testing, researching, and reviewing chairs so you don’t have to learn the hard way.